I ran away for a bit... did you miss me? I had a fabulous Holy Week, and although I didn't note it on Monday, last week's deal will continue this week. ONE person played!! Wanna play too?!?! :-P See my last post ;).
I've been feeling the effects of spring (read: sudden summer) and while there is not NEARLY as much pollen here as there was in NC, it's still sticky in the air and makes my head pound.
I think I will continue to take this week off, but I'll be back next week... get in on the sale game by commenting on last Monday's post (the one right below this one)... and hopefully I'll do enough fun things in the next few days that I'll have something entertaining to share all next week ;)
**off to bask in "spring break"... what, all the other kids here are doing it! :-P**
-Betsy

April 27, 2011
April 18, 2011
Monday Monday!
Even if you don't want to play with me, you're still going to get to hear about how you CAN each week... until someone DOES ;)
So this week, Random.org has chosen 2-45, Path to Heaven!

To play with me, any time this week, go to www.somethingbetsy.com and stare at all the pretty pictures. Then come back here, and comment with the image number (or numbers) you like most! I'll write all the suckers down (you don't have to make separate comments) and assign each a number. Then... I'll use Random.com to choose one for next week's Monday Monday! Come back next week to see if one of your images made the cut!
Fine print: Each person can only submit each image ONCE. BUT, you can pick as many images as you like, and you can definitely send your friends over to comment "for" you. The only other stipulation: the image cannot have been featured for the past 4 weeks. Now... comment away!
These buttons will add this week's image to a shopping cart... which means there is no limit to the quantity/type! You can also shop from the website www.somethingbetsy.com to the same shopping cart (only pay shipping once!). So shop away, or make sure to check back next Monday for a different random sale!
-Betsy
So this week, Random.org has chosen 2-45, Path to Heaven!
To play with me, any time this week, go to www.somethingbetsy.com and stare at all the pretty pictures. Then come back here, and comment with the image number (or numbers) you like most! I'll write all the suckers down (you don't have to make separate comments) and assign each a number. Then... I'll use Random.com to choose one for next week's Monday Monday! Come back next week to see if one of your images made the cut!
Fine print: Each person can only submit each image ONCE. BUT, you can pick as many images as you like, and you can definitely send your friends over to comment "for" you. The only other stipulation: the image cannot have been featured for the past 4 weeks. Now... comment away!
These buttons will add this week's image to a shopping cart... which means there is no limit to the quantity/type! You can also shop from the website www.somethingbetsy.com to the same shopping cart (only pay shipping once!). So shop away, or make sure to check back next Monday for a different random sale!
-Betsy
April 15, 2011
Food Friday - Mac and Cheese?
I apologize. I tried out a new recipe this week, which was a big hit... and never took a picture of it. And I even had the opportunity, since there were leftovers! But looking back at the food photos I have of recipes I haven't posted... they're not that exciting. So I'm going to hammer on and post this Mac and Cheese recipe I found on the internets with this instead:
 I quartered the original recipe for the two of us, but it would be MUCH easier to make only halved... so here's the halved recipe (with my tweaks). The reviews of the recipe had said to double the sauce... so this is the doubled sauce measurements:
Baked Mac and Cheese - serves 8-10
8 oz Elbow Macaroni (half a box generally)
1/2 cup evaporated milk (one tiny can will work)
2 eggs
8 oz sour cream (comes that way in the small container :-P)
1 tsp seasoned salt
1/2 tsp black pepper
1.5 cup shredded cheddar (I used colby and it was still yummy)
1/4 cup parmesan
(1/2 tbsp butter, melted) - I didn't use butter and it was still delicious.
1. Cook pasta according to package - al dente. Strain pasta and cool off pot slightly with cold water.
2. Mix milk, eggs, sour cream, season salt & pepper in cooled pasta pot (saves dishes!)
3. return pasta to pot, and add (or grate in) cheese (not the parmesean). FOLD IN the cheese to the pasta and milk mixture. Try stirring with figure 8's and don't expect the cheese to melt. DO NOT ADD HEAT. Once the cheese and milk and pasta are all mixed together, put it in a small glass dish. I used our round, straight walled pyrex.
4. Sprinkle the top with the parmesan, and if you want... drizzle the melted butter on top (it might make the parmesan crispier?)
5. Bake at 350* for 30 minutes or until the milk mixture thickens.
We all know by now (and if you don't, you will) that I don't measure well, and by well, I mean at all :-P. So I didn't really measure the cheese... I grated about... 4-6 oz in though probably? And then sprinkled a... bunch? of parmesan on top.
This mac and cheese could totally suffice as a meal. I never understood Mac and Cheese as dinner before... but I'd always imagined Kraft. This stuff was delicious, and I totally didn't have room for all my chicken 0:-P
-Betsy
April 14, 2011
Thing Thursday - Recipe Calendar Tutorial
WARNING! This is a VERY long post... telling you how to make this:

Also, pardon my flash. My craft room is not fabulous at lighting, and to show detail... flash was required. Which means that not all these photos are fabulous. I'm sure you'll love me anyway.
If you don't care about how to make this... see ya tomorrow! OR, play with me from Monday's Post ;)
A number of people (mostly in real life) have said that they'd LOVE a recipe calendar. But I'm not interested in MAKING everyone recipe calendars... SO... I decided to TELL you how to make your own. Because really... if you know how to use your sewing machine and iron? it's not that hard. I just ask that you use this for personal use only.
First things first... here's what you need to get/have.
 2.5 yards of fabric, 3/8 inch dowel (I used oak), ribbon or string, yard stick (or long straight edge), measuring tape, pins, chalk, scissors, iron, a sewing machine (oh, and thread), and a paper bag.
**note: these measurements will provide you with a 29" wide calendar. This should JUST fit standard fridges. I gave myself some "wiggle room" with the tutorial version... and now it doesn't fit on my fridge :-/ (hence the "hang on the wall" photo). The measurements have been altered so it will fit on YOUR fridge though. :) Also, I laminate my recipes, so it's perfect for 4x6 recipes, but obviously, 3x5 cards fit well too.
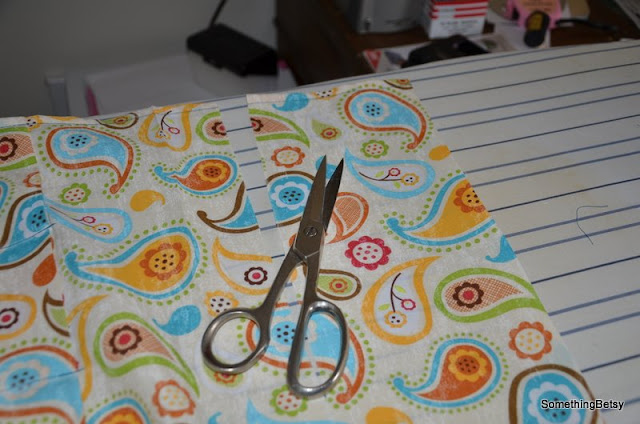
Step 1: Cut fabric to 30 inches wide
 Step 2: Hem the bottom edge by folding over once, and then again. I did this in 2 steps, but you can do it in one if you find that easier. I recommend a half inch hem, because it's easier to sew.

 Step 3: Prep your grocery bag by cutting the bottom off and up the seam.
 Draw a straight line across the edge of the bag, then measure 5", 6", 13" and 14" from that line, and draw parallel lines. Cut into strips along the original line, the 6" line and the 14" line. These are now your "folding templates".
 Step 4: Iron. The goal here is to crease your fabric, so steam is a good idea (and maybe even starch if you're so inclined). You'll line up the hemmed edge along the line on the 5" template strip, and then push up the bag until it's tight against the edge of the paper and iron the whole thing.
 You'll then take the 5" template, and line up the creased edge. The crease you iron next should line up with your hem.

 Then use your 7" template to form the next fold. You'll alternate between the 5" and 7" folds until there are 6 pockets. I recommend pinning your folds together after each 5" round, and re-pinning the two pins below it to catch the "new layers" that have been created since they were put in.
 Note that you'll need to fold up some of the fabric when ironing the 7" creases
 When you've completed 6 pockets worth, make sure everything is pinned securely. It can be a little tricky flipping the piece over and over, even with it all pinned, but give it a few go's and I'm sure you'll figure it out.
 Step 5: Now, hem the edges with a half inch double hem again. I recommend pinning from the inside to the outside of the fabric to catch all the layers (and keep it from un-folding on you).

 Step 6: Sew down the edge, and repeat on the other side

 Step 7: Once the two edges are hemmed, you can measure out the pockets. You'll want to be as accurate as possible here to get exactly 4" between each sew line. (If you have a better method than chalk... use it! and tell me!)
 Step 8: When sewing the pockets, start at the edge of the top pocket... not the top of the fabric. And always make sure to back stitch to lock the stitches in. It's really beneficial if you're good at sewing straight for this step ;). I suggest going from "top to bottom" because it keeps the flaps from folding up under the sewing foot on the back side of the fabric.
 As you move across the fabric, roll the calendar to fit in the throat of the machine
 When you're done, you'll have 7 pockets across and 6 pockets up and down, with a bunch of "extra" fabric at the top.
 Step 9: I chose to have 3.5" between the top pocket and the top of the calendar with a 1.5" pocket (plus 1/2" seam allowance) so I drew a line 5.5" above the top pocket. You may want to consider leaving more space if you plan on embellishing it (some suggestions are at the end).
 Cut the leftover fabric strip off along your line
 Step 10: Time to make our pocket! Iron down a half inch single fold hem (this edge will be hidden, so you don't need the double fold)
 Then fold the edge down to make a pocket. The 1.5" pocket nicely fits the 3/8" rod. Pin the pocket in place, making sure that you fold the very corner under so it doesn't poke out on the final project.
 Sew the pocket down twice - your whole calendar and all your recipes will hang from this, so it's nice to have it a little extra secure.
 You're essentially done! Slide the rod into your pocket
 Tie some string or ribbon on to the rod, and hang! If you're feeling really motivated, you can drill holes in the dowel to thread the string through so it doesn't slide later. If you plan on hanging this on your fridge, then lace the string through the door (between the door and the fridge itself) and through the door handle before tying the second side on. The string will sit against the edge of the door frame (above the sealing strip).
Sadly, the little epoxy paper clips I used on my original one were a clearance item at Michael's I've not seen since. I saw them in Walmart a while back... but they appear to have disappeared. I saw something similar at Office Max as well. Now... Amazon is the best I can do :-(. Another option would be mini clothes pins with just numbers (for the more simplistic) or with things glued to them with numbers for a cuter look. You'll want at least 36 number pieces... a 1-31 and an extra 1-4 and 30-31 (Lets you fill in the last/first week of the month.)
Now... for those embellishment suggestions! I'm not a big embellishment person, But I probably wouldn't be against a little S-M-T-W-R-F-S above each of the days. OR, putting a bit of Velcro on (before sewing the rod pocket down) and making some month markers to change out. Other ideas for "fancy-fing" would be to use ribbon on the sewing lines, and/or as binding around the edges.
And make sure you make yourself some of my favorite "recipe cards" like...
I love being able to build my grocery list off this each week to make the most of the fresh food I need to buy, and to make sure I'm accounting for our time out of town or on nights we have other commitments! It also is great to reference back to, to see how overdue those leftovers are for the garbage :-P.
If you make one, let me know! I'd love to see yours and hear if you like it!
-Betsy
A Recipe Calendar of your very own!
If you don't care about how to make this... see ya tomorrow! OR, play with me from Monday's Post ;)
A number of people (mostly in real life) have said that they'd LOVE a recipe calendar. But I'm not interested in MAKING everyone recipe calendars... SO... I decided to TELL you how to make your own. Because really... if you know how to use your sewing machine and iron? it's not that hard. I just ask that you use this for personal use only.
First things first... here's what you need to get/have.

**note: these measurements will provide you with a 29" wide calendar. This should JUST fit standard fridges. I gave myself some "wiggle room" with the tutorial version... and now it doesn't fit on my fridge :-/ (hence the "hang on the wall" photo). The measurements have been altered so it will fit on YOUR fridge though. :) Also, I laminate my recipes, so it's perfect for 4x6 recipes, but obviously, 3x5 cards fit well too.
Step 1: Cut fabric to 30 inches wide


Now... for those embellishment suggestions! I'm not a big embellishment person, But I probably wouldn't be against a little S-M-T-W-R-F-S above each of the days. OR, putting a bit of Velcro on (before sewing the rod pocket down) and making some month markers to change out. Other ideas for "fancy-fing" would be to use ribbon on the sewing lines, and/or as binding around the edges.
And make sure you make yourself some of my favorite "recipe cards" like...
Out to Dinner
Leftovers
Out of Town
Your local Pizza Joint and Chinese Place (with phone numbers)
I love being able to build my grocery list off this each week to make the most of the fresh food I need to buy, and to make sure I'm accounting for our time out of town or on nights we have other commitments! It also is great to reference back to, to see how overdue those leftovers are for the garbage :-P.
If you make one, let me know! I'd love to see yours and hear if you like it!
-Betsy
April 13, 2011
Wordless Wednesday (NOT) - Renewal

To be honest, I'm a little glad that Easter is almost here... and not because of the joyfulness of Easter and the reminder of what it means... but because Lent will be over. This is probably part of the reason Lent isn't 30 days (which passed a few days ago, which I know because my flossers ran out, and it's a 30 pack I opened on Ash Wednesday). It's 40 days. You get tired of it... but it's not done yet. And you SO can't complain, because 40 days without some luxury is nowhere NEAR as bad as starving in the desert or assisting in your own crucifixion. Thanks Jesus. I'm REALLY glad you don't require either of those of me. (Not kidding here)
So, because Lent ISN'T over... you can count on at least a few more regularly scheduled themed posts... because I gave up lazyness for lent, and thereby am not allowed to think up (read: utilize) any of the multitude of reasons for NOT doing something I should. On a good note, I have flossed my teeth EVERY NIGHT (ok, I missed ONE), and written a blog post every weekday. I've done slightly poorer on the working out every day, and completing all my "to-do" items (in actuality... I stopped keeping a to-do list... so that could go one way or the other on the success scale, but I'd say that it's "lazier" than not). However, there have been many times I've said "you're just being lazy" and kicked myself in the butt. It's gotten less and less the further we get from Ash Wednesday... but I'm trying.
So since I have another project that is supposed to be this week's Thing Thursday (which means I need to get on it, since it's half done and is supposed to be posted tomorrow...) This is my "Wordless Wednesday"... obviously, with words ;).
-Betsy

April 12, 2011
Touch Up Tuesday
I SHOULD have gone outside today to take some pictures of spring or something, and then edited them for Touch Up Tuesday... but... I didn't. So here's a photo I enjoy from our last trip to the forest... simple photo, simple edit.


-Betsy
Linking up with Paper Heart Camera!
-Betsy
April 11, 2011
Monday Monday!
Who hasn't forgotten that it's Monday?
THIS GIRL!
Who's STILL playing this game "old school"?
This girl :(
Play with me this week! I mean, if your photo gets picked... you get 10%! Or bragging rights if you don't actually wanna buy it.
So this week, Random.org has chosen 4-34, Autumn Leaves!

To play with me, any time this week, go to www.somethingbetsy.com and stare at all the pretty pictures. Then come back here, and comment with the image number (or numbers) you like most! I'll write all the suckers down (you don't have to make separate comments) and assign each a number. Then... I'll use Random.com to choose one for next week's Monday Monday! Come back next week to see if one of your images made the cut!
Fine print: Each person can only submit each image ONCE. BUT, you can pick as many images as you like, and you can definitely send your friends over to comment "for" you. The only other stipulation: the image cannot have been featured for the past 4 weeks. Now... comment away!
**This episode of "Monday Monday" has expired... but check out this week's for a current deal!**
-Betsy
THIS GIRL!
Who's STILL playing this game "old school"?
This girl :(
Play with me this week! I mean, if your photo gets picked... you get 10%! Or bragging rights if you don't actually wanna buy it.
So this week, Random.org has chosen 4-34, Autumn Leaves!
To play with me, any time this week, go to www.somethingbetsy.com and stare at all the pretty pictures. Then come back here, and comment with the image number (or numbers) you like most! I'll write all the suckers down (you don't have to make separate comments) and assign each a number. Then... I'll use Random.com to choose one for next week's Monday Monday! Come back next week to see if one of your images made the cut!
Fine print: Each person can only submit each image ONCE. BUT, you can pick as many images as you like, and you can definitely send your friends over to comment "for" you. The only other stipulation: the image cannot have been featured for the past 4 weeks. Now... comment away!
**This episode of "Monday Monday" has expired... but check out this week's for a current deal!**
-Betsy
April 8, 2011
Food Friday - Shrimp Scampi

Fortunately, today's actual dinner hasn't been posted on my blog before (I'm not really sure how... oh, wait, yes I do... I didn't have a picture before...). Tonight we are having Shrimp Scampi!! This is a favorite of ours, and especially mine, because it was the first birthday dinner Hubby ever cooked for me. I knew he wanted to do something special, but I also knew that a "complicated" dinner was making him nervous. Shrimp scampi seems all sorts of fancy, but really... it's very simple! (AND - the reason it's an extra favorite of mine, is Hubby didn't know how to cook it, so he bought Joy of Cooking for the recipe... and my birthday present :-P... and I LOVE that cookbook!)
So, here it is. Joy of Cooking style:
Combine in a large skillet:
1/2 cup olive oil
1 tbsp minced garlic
Cook, stirring occasionally, over very low heat until the garlic is golden, about 10 minutes; do not rush it. Increase the heat to medium-high and add
1 1/2 to 2 lbs large or extra-large shrimp, peeled and deveined (as long as it's the right weight, you could totally go smaller on the shrimp)
Cook until the shrimp turn pink on the bottom, and turn them over. Add
1/4 cup minced parsley (less if dried)
(1 tsp minced garlic) - optional
Cook until the shrimp are firm and pink, about five minutes total. Sprinkle with
1 tbsp fresh lemon juice
Minced parsley
Now... that's not now it gets made regularly here, because we totally add chardonnay, and don't use parsley. Of course, we generally don't MEASURE either... so... that's that. Ours is more of a
coat the bottom of a pan with oil and brown up at LEAST a tsp of minced garlic (from the jar), add a splash of chardonnay and lemon juice and simmer. Add about a dozen and a half extra large shrimp (for the two of us), cook until pink throughout. Meanwhile, boil up some spaghetti and when ready, combine. Serve with a sprinkle of parsley if we remember that step and Parmesan cheese (from the jar)
Enjoy!
-Betsy
April 7, 2011
Thing Thursday
Have you noticed the time stamps on my posts this week? It is painfully obvious that I haven't SCHEDULED any posts? :-P. Will you love me anyway?
I was a little stuck on Thing Thursday until I started giving reasons as to why I was stuck. And then the GENIUS in me went "hey, chica! YOU BOUGHT A CAR!". Oh! That's right! I gots a new car! Now, most of you probably (don't) know that I had a Convertible Bug before...

But it's warranty was up, and VW's are EXPENSIVE to fix. We had planned on selling it this month or next (just in time for graduations) when I brought it in to the shop for a recall repair, an oil change, and to find out why the engine light kept coming on. Needless to say, the $600+ dollars required to turn off the engine light... significantly helped the decision to buy THAT DAY instead of a few weeks later.
I tried out the GMC Terrain and the Mitsubishi Outlander Sport, and we went with the Sport. I like it... it has a SMALLER turning radius than the bug, but has a back seat that an adult could fit in (which means I can participate in car-pools now, not just mooch), and a trunk that actually fits all my groceries!! It also came with a FABULOUS warranty... so we'll be all set for the "why did THAT break?" moments for the next 10 years. Yup, 10.
Yes, I was sad to get rid of the bug. Yes, I cried. (Yes, hubby laughed at me for mourning a car). But this new one is growing on me. I was bummed Monday (when I got that sunburn) that I couldn't put my roof down (maybe it's a good thing the roof won't go down on this one...), but something about being tall enough to see over other car's hoods, and thereby being able to safely make rights on red so the cars behind me don't honk because I'm waiting for the arrow? made it easier to swallow. Plus... it's still a super cute small (looking) car. With 4WD :-P.

I really enjoyed my facebook status when I got home too:
-Betsy
P.S. Aren't you glad I decided to write about my CAR today, instead of the RIDICULOUSNESS that is going on in politics? Good, me too... cause I'm FUMING about it and would DEFINITELY say something I'd regret. I've already halted myself from spouting 3 or 4 times today. *shakes head*
I was a little stuck on Thing Thursday until I started giving reasons as to why I was stuck. And then the GENIUS in me went "hey, chica! YOU BOUGHT A CAR!". Oh! That's right! I gots a new car! Now, most of you probably (don't) know that I had a Convertible Bug before...
But it's warranty was up, and VW's are EXPENSIVE to fix. We had planned on selling it this month or next (just in time for graduations) when I brought it in to the shop for a recall repair, an oil change, and to find out why the engine light kept coming on. Needless to say, the $600+ dollars required to turn off the engine light... significantly helped the decision to buy THAT DAY instead of a few weeks later.
I tried out the GMC Terrain and the Mitsubishi Outlander Sport, and we went with the Sport. I like it... it has a SMALLER turning radius than the bug, but has a back seat that an adult could fit in (which means I can participate in car-pools now, not just mooch), and a trunk that actually fits all my groceries!! It also came with a FABULOUS warranty... so we'll be all set for the "why did THAT break?" moments for the next 10 years. Yup, 10.
Yes, I was sad to get rid of the bug. Yes, I cried. (Yes, hubby laughed at me for mourning a car). But this new one is growing on me. I was bummed Monday (when I got that sunburn) that I couldn't put my roof down (maybe it's a good thing the roof won't go down on this one...), but something about being tall enough to see over other car's hoods, and thereby being able to safely make rights on red so the cars behind me don't honk because I'm waiting for the arrow? made it easier to swallow. Plus... it's still a super cute small (looking) car. With 4WD :-P.
I really enjoyed my facebook status when I got home too:
-Betsy
P.S. Aren't you glad I decided to write about my CAR today, instead of the RIDICULOUSNESS that is going on in politics? Good, me too... cause I'm FUMING about it and would DEFINITELY say something I'd regret. I've already halted myself from spouting 3 or 4 times today. *shakes head*
April 6, 2011
Wordless Wednesday - ish
Wordless Wednesday is supposed to be self explanatory... but I think this week's needed a LITTLE help.
This... is why I like cool weather.


-Betsy
This... is why I like cool weather.

Linking...
-Betsy
April 5, 2011
Touch Up Tuesday
My goodness! It's Tuesday!
Last Tuesday we went to see the Cherry Blossoms in DC...
this was my camera shot:

And my edited shot!

What do you think?
Did anyone else play in a "Touch Up Tuesday" linky party this week?
How about just a "touch up" blog post any old time in the past week?
Tell me about it!
-Betsy
P.S. Don't forget to enter photos in the Monday Monday drawing this week!!
P.P.S. totally forgot to link this! Eh, what's one day late? :-P
Last Tuesday we went to see the Cherry Blossoms in DC...
this was my camera shot:
And my edited shot!
What do you think?
Did anyone else play in a "Touch Up Tuesday" linky party this week?
How about just a "touch up" blog post any old time in the past week?
Tell me about it!
-Betsy
P.S. Don't forget to enter photos in the Monday Monday drawing this week!!
P.P.S. totally forgot to link this! Eh, what's one day late? :-P
April 4, 2011
Monday Monday!

No one played with me this week.
Not even ONE suggestion!
Good thing I don't give up easily. You can play this week instead :)
So this week's image was chosen from ALL the images on my website at random via random.org in 2 rounds: once for the gallery, the second for the image number. And... Ta da!!! It's 7-9... Sunset Pier :) (and no, I didn't include the screen shots from random.org this time... but you can trust me.)

Now... to play this week (and in future weeks)... go over to my website, and peruse the galleries. Pick a photo you like, and put the image number (example, 7-9) in a comment here, or on my facebook page as a comment on the blog post status update. You can pick AS MANY PHOTOS as you'd like. You can only vote once for each photo each week (but you CAN get friends to enter the same photo as you :-P). Also, a photo can only be showcased once every 4 weeks... I'll take all eligible entries, assign each a number, and use random.org to choose which one is 10% off next week!
While you can't vote for a photo more than once a week... you can vote for the same photo every week if you want... just make sure to check back in the next week to see if you're photo got picked so you can snag up the goods 10% off!
-------------------------------------------------------------
This image's discount has been removed. Check out this week's Monday Monday for the current discounted photograph!-Betsy
April 1, 2011
Food Friday
By special request (an old one, but still)... today's Food Friday is an alcoholic beverage :-D.
I made this for a party the other day, and it's a classic "punch" at the in-laws Christmas party!

These are super easy:
1 can frozen limeaid concentrate
1 can (from the limeaid) of Southern Comfort
3 cans cranberry juice
Add ice, serve. :)
To make ONE glass,
1 shot SoCo
ice
fill with cranberry juice
splash some lime juice in there
It's pretty yummy... but I like cranberry with lime anyway :)
-Betsy
P.S. APRIL FOOLS!!
Not really... this really is yummy :)
I made this for a party the other day, and it's a classic "punch" at the in-laws Christmas party!
Scarlet O'Hara's!
(sorry, SO not my picture. Click on it to go to the original page)
These are super easy:
1 can frozen limeaid concentrate
1 can (from the limeaid) of Southern Comfort
3 cans cranberry juice
Add ice, serve. :)
To make ONE glass,
1 shot SoCo
ice
fill with cranberry juice
splash some lime juice in there
It's pretty yummy... but I like cranberry with lime anyway :)
-Betsy
P.S. APRIL FOOLS!!
Not really... this really is yummy :)
Subscribe to:
Posts (Atom)