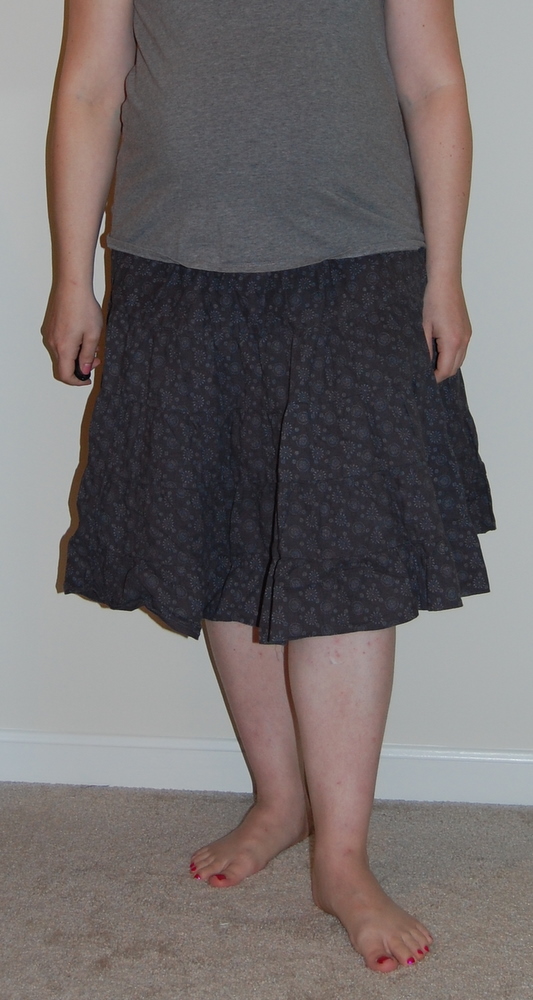
A friend of mine has been patiently waiting for me to show you all how I made my maternity clothes, and after writing posts for the rest of the week, I'm "re-arranging" a day so you get the REAL tutorial first. Unfortunately, this is also the last real "tutorial" you'll get! The rest are basic "how-to's" that you'll need to experiment a little on your own to make work for you. I'm sure you'll all live. I actually wrote the tutorial a month ago, and am finally getting around to inserting the pictures and posting it. Here goes!
So I keep promising that I'll show you the maternity outfits/pieces I've put together over the past....
7 8 months or so (yup...
SEVEN EIGHT months pregnant now!)... and I'm finally going to do one. Warning: this is incredibly wordy. I blame my 8th grade trip to Ireland where I kissed the Blarney Stone. My mom has been wondering ever since if I kiss it again... will I SHUT UP?!?! :-P (OK, for real... my sister wonders that, not my mom) If you're not into words, look at these pretty pictures here...
Trial Version in blue Seersucker Good version in grey printed cotton
(and yes, I end up wearing the "trial" version more often due to the extra few inches)
Say "oooh. nice!" and I'll see you in about 2 weeks, when the "Maternity Fashion" session is over!
Wow, you're still here? For now at least *wink wink*.
I made 2 of these skirts, one as a "trial" and one as a "good one" and neither came out quite as I anticipated, but I think if I made a third, I'd get it spot on! I'll give the dimensions for the "spot on" skirt :-P
First, I must say that I don't like regular maternity clothes. I haven't liked the waistbands on anything I've owned... I like a small bit of elastic that fits below this enormous belly. That's not how regular clothes work... APPARENTLY, people like having their bellies covered. More support or something (or perhaps, just not having their tummies (and stretch marks) on display to the world when a wind kicks up. FORTUNATELY, putting a belly panel on really ANY item of clothing isn't too hard - and I'll get to that explanation soon enough... in my
"How I found my perfect maternity pants" post coming.... eventually three Maternity Pants posts later this week.
ANYWAY, I've ended up buying regular elastic waist items and just pushing them below (or above, depending) my belly. The problem? You get what I affectionately termed something I wouldn't say to grandma, and so won't write here... but we'll say "man space" instead. It's that bulge of extra fabric that SHOULD be around your waist... but isn't. So I finally buckled down, got my machine fixed (the tension was extra wonky), and did some experimenting with the ruffler foot that hubby got me for my birthday (cause he's the best hubby in the WORLD and bought me sewing stuff :-P). If you don't have a ruffler foot, you can still make a peasant skirt, you'll just need to use a gathering stitch and way more pins than me. I hate pins... hence the ruffler foot :). You'll want to check out
Happy Together's Let Freedom Ring Tutorial and use it after step 5.
What I came up with, was two really cute peasant skirts that make me feel better about wearing the 4 tee-shirts I bought when I first got pregnant - it like, triples my wardrobe, right!?!? Something tells me that real soon,
I'm going to have to attempt to clone those as well... they're getting awfully "short"... Maybe I'll just try that belly band again... I might have to start caring about where the shirts hit. I probably won't though ;)
Needless to say, it's pretty easy, though time-consuming. It took me 4-5 hours for each skirt, but only about 2 yards of fabric (on sale!), 1 yard of elastic, some thread, and one sewing machine needle... so about $6.00! (after sewing this skirt, you'll need to change your needle - it's just a LOT of stitches. Don't whine about it... just do it.) A lot of that time was getting my fabric cut, making sure I wasn't screwing up, and taking pictures.
Here's how I made mine for my extra-large booty/bump combo ;) - side note: you can totally make a non-preggers skirt with this "tutorial" - I'll point out which step to skip when we get there!
1) Go to the fabric store, and pick a fabric that you like. Get at least 2.5 yards. I only ended up using 2, but after many "crap!" moments of running out when making a "nice" item... get extra. Take it home and WASH IT so it's done all the shrinking it plans on doing BEFORE you piece it together. Iron out all the crinkles from leaving it in the dryer overnight and trim the edge of your fabric so that it's even. (long step one, but I figured it's all "prep" and you'd live.)
2) Figure out how big around it needs to be. To be honest... I have no real idea how big around I am right now, nor do I want to know. The general rule is to use 1.5 to 2 times the fabric the length you need to cover (just like with curtains)... in skirt 1, I just used the width of the bolt (I wrapped it around me, it went more than once and not quite twice... I went with it. It was 57" wide. For skirt 2, I used 56" since it worked for skirt 1.
3) Figure out how LONG you want the top tier. I tried 13" and 11"... I like 11" better. I'm 5'5", and 13" hits the base of my booty, where 11" hits the point that's farthest out. (P.S. that included space for my casing which was 1/2"... if you're using elastic wider than 1/4" you'll need to add some room on top... or not since the measurements on here aren't really tight)
4) Cut a rectangle of fabric that is YOUR "around" x "long"... so for me... 56"x11". You can also cut 2 pieces that EQUAL that (plus seam allowances) and sew them together. Depends on your fabric and what makes you happy.

5) Now... this is the "skip if you don't have a bump" step. For those that HAVE bumps... we're going to put the "rise" (which is really the opposite of what it really is, but whatever) in our skirt now. You need to figure out the distance in height from where you want the back of your skirt to sit.... to where you want the front of it to sit. My "rise" is 5" (big booty, big bump). We're going to cut a big arc cut in the rectangle of fabric that goes down 5" (or your "rise") and 2/3 of the total length. I found that 2/3's gathered worked nicely and gave me an even hem (since that's the goal here). So folded in half, we take 1/3 (because we're now working with HALF our length) and mark that far from the fold. In my case: 19". Then we make a nice, sweeping arc from one mark (19") to the other (5") like in the picture here. Note: on skirt one, I took it UP from the bottom and left the waist even... on skirt 2 I took it DOWN from the top and had an arc in the waist. Skirt 1 was easier to finish.

6) Now, we have to figure out our ruffler... my skirts were ruffled on a setting of one ruffle per 6 stitches, at a depth of 3 and a stitch length of 3. It's the ruffle that made me happy (and a shallower ruffle didn't agree with my fabric it seemed). If you want less ruffle, you can: increase the stitch length, decrease the depth, or ruffle every 12 stitches... it's totally up to you. Take a scrap of fabric and ruffle it for a known distance (I used 5 inches) and then measure again AFTER ruffling. You'll need to do this to figure out how much fabric to cut. My 5" distance became 4" after ruffling... so now it's time to do some math. I'm just going to show you MY math, and you can figure out your own from there (hopefully)
I have 56" of fabric on the 1st tier...
so I multiply 56 by 5 and then divide by 4 to get my needed length for tier 2: 70"
That means I need 70" of fabric to ruffle around ONCE on my skirt. I plan to have four tiers total, so I do the math again.
Tier 3: 70 x 5 / 4 = 87.5 (and round up)
Tier 4: 88 x 5 / 4 = 110
And I need to plan on extra "just because" (an experience thing again) I randomly chose 36".
So I need: 70 + 88 + 110 + 36 = 304 inches of fabric.
Don't worry - it's not all in one strip... yet. We're going to cut our fabric into 6" strips and sew them together into one LONG piece of fabric. Take how wide your bolt (or fabric) is, subtract 1" (for seam allowances and good luck) and divide 304 by that number: my number was 30. That means I'll need 10.1 strips... so really... 11... which just ups my insurance on having enough. (Skirt 1 needed some finessing due to no extra... I was very happy to have 15" extra on skirt 2! It'll be perfect for a little twisted flower detail on something else!)
7) Cut your strips... however works best for you... I folded my fabric neatly and cut it with a rotary cutter... if you have any tips for better methods, I'm all ears!
8) Sew your strips together to make one HUGE strip. This is because although we're SUPPOSED to need 70" for the first tier... we might end up needing a little more or a little less, and this guarantees us we'll have enough at each round. You CAN sew these with your ruffler foot still attached to the machine (since it can be a bear to put on)... just put the stitch length on "Star" - aka, "infinity" or you can switch out to your regular foot, or you can just wing it and cut and stitch before testing your ruffles... whatever suits your fancy.

9) Now... we ruffle. Put your strip into your ruffler right side down, and then line up your "modified rectangle" UNDER the presser foot right side up (aka, right sides together), lower the presser foot, and sew away. I used a 1/2" seam allowance, if you're really good with your ruffler, you can use the little guides, but it wasn't working for this novice that way... so I gave up. Ruffle ALL THE WAY ACROSS your "rectangle". Trim off the extra fabric on the sides... and do it again on the next tier. And again on the next tier. And if you chose to have more tiers... then keep-on going.
10) WHEW! Done ruffling! Now it's time to hem our raw edges. I used a narrow rolled hem foot to put a nice little "professional" hem on the bottom of the skirt, but you can hem (or serge or interlock, or whatever) any way you'd like. I <3 my rolled-hem foot... and it only cost me $10!
I'm debating getting I even got a 1/4" one... ANYWAY... hem your bottom edge. I also did the narrow rolled hem on the top edge so I could just simply "fold over" the top to make a casing later. If you'd like, sew that 1st fold of the casing over now.
11) Are we there yet?!?!? This step is 100% optional, so if you're bored... feel free to move on. I wanted a more "professional" look inside that might hold up to the wash a tiny bit better... so I "overlocked" all the ruffled edges on the inside. I don't have a serger, or a serge-and-cut foot (it's on my wishlist) or anything else... so it was just a zig-zag over the edge of the fabric... aka, I kept the edge of the ruffle in the center of the foot and just went with it. Do that for each exposed edge.

12) It's time to make it a circle! So far, we've been sewing the way I like to knit... flat. But it's time to join the sides of our skirt... so with right sides facing, pin the skirt together (notice this is our first use of pins?) and make sure that each seam meets itself so you're even when it's done. Then straight stitch all the way down, making sure to lock your stitches at the beginning and end. Then trim any "extra" (I always have extra on seams....) and overlock again down the side (make sure your zig zag doesn't sew over your straight stitch line though!).

13) FINALLY... we're at the casing! Fold your top edge of your skirt over 1/4" more than your elastic is wide. Mine was 1/4" elastic, so I folded over 1/2" (and pinned, cause I had a curvy edge). I do suggest you pin here so you can just worry about keeping your seam even without worrying about where your fabric is trying to lie. Straight stitch ALMOST all the way around your skirt. Don't worry if things get a little wonky... there's gathering involved, so no one will ever notice. Make sure you start about 1" away from your seam and stop another 1" from it when you finish so you can thread your elastic through.

14) Thread some elastic with a safety pin through the casing and cinch it down until it feels snug on you. Technically, you should be able to use that "around" measurement from the beginning and subtract 5"-6" and have that be your final elastic length... but my pregnant belly is sensitive... hence the skirt. So I just experiment. I also wear my skirts unfinished for a while (elastic held in place and to the seam with said safety pin) to make sure it's comfy (not too loose or too tight) before I finish it off. I have adjusted my elastic EVERY time.
15) Once you're happy with the elastic length, sew the two ends of elastic together, and finish off those 2 inches of casing. Ta da! You're finally done (only 15 steps later!)
Now your skirt hem is actually FLAT, your belly is happy, AND it only cost you $6.00.
If you like a belly panel on your skirt, you can either add one on top of the elastic (which I plan on doing once my shirts get too short) or forgo the elastic and just add a belly panel instead. More on that hopefully soon!
If you made it this far: I love you too!! Let me know if you make one yourself!
-
Betsy